![]() CONTEXT / SCOPE
CONTEXT / SCOPE
The purpose of this SOP is to provide the CSM with clear instructions and steps to ensure full understanding of the Learning Module. Having this knowledge will improve how CSMs provide their training sessions, as well as be more prepared for questions the admins will have.
![]() IMPACTED TEAMS
IMPACTED TEAMS
Strategic CSMs
Core CSMs
CS Operations
![]() GLOSSARY
GLOSSARY
CEUs - Continuing Education Units
CME - Continuing Medical Education
CRED SOFT - Self-Managed Credentialing Software(Credentialing Software)
CRED SERV / FMC - Fully Managed Credentialing Service (Credentialing Service)
CSM – Customer Success Manager
LMS- Learning Management System
Opp - Opportunity (where RSM registers the process of sales and information about the purchased product.)
SF - Salesforce
TL - Team Lead
![]() TABLE OF CONTENTS
TABLE OF CONTENTS
Make sure that you have uploaded the completed Locations, Departments and Positions rosters into the system (these will be requested since your first email using the Welcome to MedTrainer! CSM Template available in Outreach). After that,
Ensure to send the admin the downloaded Employee roster from their account’s Employee Center. (this will be required in the Onboarding Call Recap email template) Once that is completed by the admin, you will be able to upload their employee lists with less issues.
Ideally, the admin’s accounts can be set with their employees before training sessions. If this is not possible before then, simply remind the admin it is important to do so in case they would like assistance with initial setup. Please follow the Initial Organization Management Setup, and feel free to forward this file to your admins in its PDF form 
Ideally, the admin’s accounts can be set with their employees before training sessions. If this is not possible before then, simply remind the admin it is important to do so in case they would like assistance with initial setup. Please follow the Initial Organization Management Setup, and feel free to forward this file to your admins in its PDF form as well. Remember to log in the “LMS Set-Up Completed Date” field in the Onboarding Object.
Remember to enter the “LMS Set-Up Completed Date” field in the Onboarding Object.
The purpose of this is to:
Ensure you are is familiar with the system, performing all the possible tasks in each module.
Showing the admin how the system looks real time, with populated data.
Leaving the admin’s account as a clean slate to use from scratch.
Make sure to have:
Users created, of Student and Admin account levels respectively.
Course Bundles created.
In order to provide more detail of several fields within the modules and their respective pages, you can advise the admin to hover over the following icon:
In order to provide more detail of several fields within the modules and their respective pages, you can advise the admin to hover over the following icon:
If your admin would like you to schedule the meeting on a specific date and time, review Options 1, 2 and 3 sections of the Onboarding SOP.
If the admin hasn’t scheduled a training session yet, please send proposed times as shown in the Option 4: Gmail (Inserting Proposed Times) section of the Onboarding SOP.
For all the above, please make sure to select the correct meeting type when scheduling. You can find them in the Training Meeting Types Outreach Collection. Remember that we have the following:  Please note that the meeting descriptions will contain the schedule per training session, as stated in the Training Matrix (found in the https://medtrainer.atlassian.net/wiki/pages/resumedraft.action?draftId=4221435905&draftShareId=7263dcfd-160f-46aa-bf09-123b3825a5ef) |
We need to have the training sessions logged into the corresponding SF account, and confirm that the meeting also appears scheduled in Gong so that it can be recorded. You can check in Gong if your meeting appears once you click on the “View upcoming calls” section. It should appear if the process was followed. If this is not the case, please perform the following steps:
SchedMeetingGONG.mp4Please follow the https://medtrainer.atlassian.net/wiki/pages/resumedraft.action?draftId=4159504610&draftShareId=12f6a5fa-018f-4afb-8a48-51ae87f171a8 SOP to keep track of your emails, calls and meetings, both for visibility and account management purposes.
Please follow the https://medtrainer.atlassian.net/wiki/pages/resumedraft.action?draftId=4159504610&draftShareId=12f6a5fa-018f-4afb-8a48-51ae87f171a8 SOP to keep track of your emails, calls and meetings, both for visibility and account management purposes.
If this is the first training session with your admin, provide Organization Management training covering the following topics (it is suggested to follow the steps on the Initial Organization Management Setup , as it follows the recommended setup order. Feel free to forward this file to your admins as well):
Locations
How to create and modify them
How to designate a location manager

Departments
How to create and modify them
Department Visibility

Positions
Both position databases (extended and generic)
How to create and modify them

Employee Center
Creating new users
Changing employee status
6 options under each user dropdown

Full profile walkthrough

Settings:

Organization Reports:

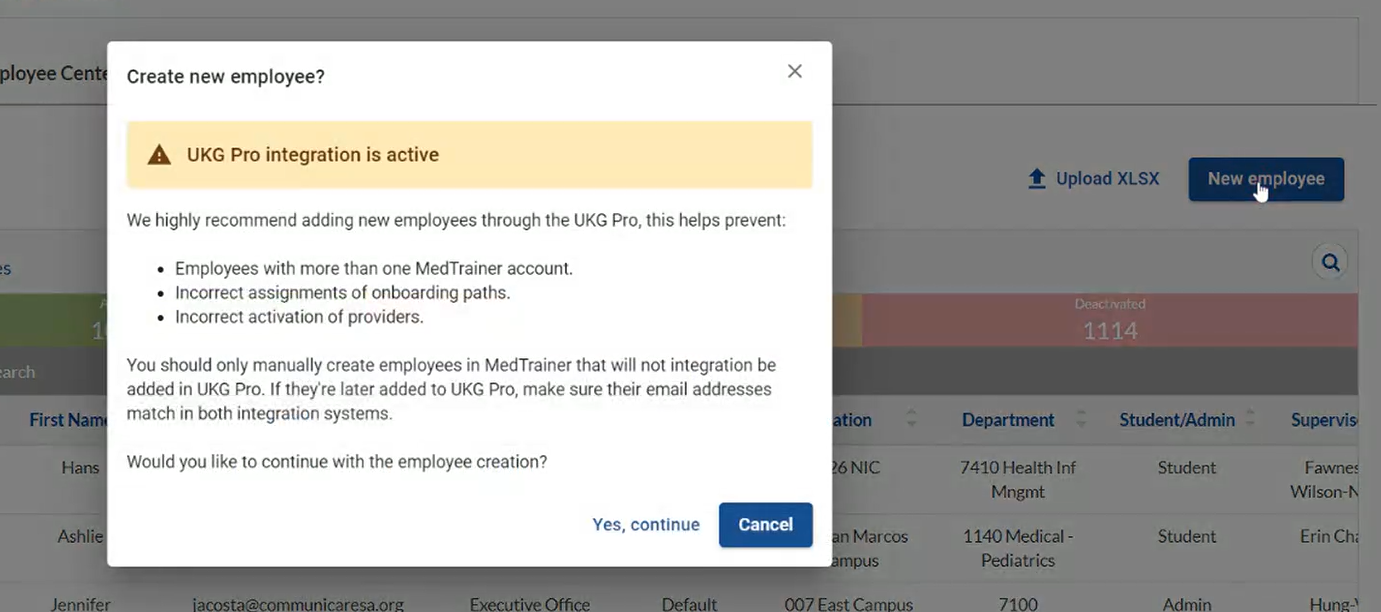
For accounts that purchased an integration: When the admins try to create employees manually from the employee center, they will see the warning message that remarks the risk of duplicated accounts or incorrect assignments. We want to encourage them to add the new employees only by the integration and to understand the possible consequences of doing manual creation. please refer to the MT-CS-018: SSO Services and HRIS Integrations SOP for more information.
This module helps admins keep their staff compliance by assigning courses on various subjects to them. They will be able to monitor course progress and keep overall results on track.
In the Marketing Database, we will find the monthly course list spreadsheet available. It is suggested to download it as an Excel spreadsheet before sending it to the admins. If they request the Google Sheets, please provide the link:
https://docs.google.com/spreadsheets/d/1dA5otB-vTnmTcLXbTg7DCv1jLiL6Xa7U/edit?usp=sharing&ouid=110045133522799162123&rtpof=true&sd=trueIn the Marketing Database, we will find the monthly course list spreadsheet available. It is suggested to download it as an Excel spreadsheet before sending it to the admins. If they request the Google Sheets, please provide the link:
https://docs.google.com/spreadsheets/d/1dA5otB-vTnmTcLXbTg7DCv1jLiL6Xa7U/edit?usp=sharing&ouid=110045133522799162123&rtpof=true&sd=truePlease note that this depends on the Company Settings they have set up for the Course Library. Make sure to show the following to the admins:

Possible combinations:
No-No: This gives the admins full control and responsibility on what their staff gets assigned. They will have the ability to streamline and standardize course assignments.
Yes-No: Admins will still have full control on assignments, but their staff will have the Course Library visible to them, and they will be able to see the contents.
Yes-Yes: Students will have full access to the Course Library, and also have the ability to self-assign courses.
Please note that this depends on the Company Settings they have set up for the Course Library. Make sure to show the following to the admins:
Possible combinations:
No-No: This gives the admins full control and responsibility on what their staff gets assigned. They will have the ability to streamline and standardize course assignments.
Yes-No: Admins will still have full control on assignments, but their staff will have the Course Library visible to them, and they will be able to see the contents.
Yes-Yes: Students will have full access to the Course Library, and also have the ability to self-assign courses.
Remember that it is possible to search for courses by state, so make sure to let the admin know:   |
This functionality lets the admins select and store groups of courses, and assign them the same way. Please walk the admin through the process of creating, locating and assigning course bundles.
CL_createbundle.mp420240704-1613-36.9958651.mp4● Send email: To notify the assigned people |
Make sure to mention that it is the same process to assign courses outside of bundles, or single courses. Single assignments look like this:
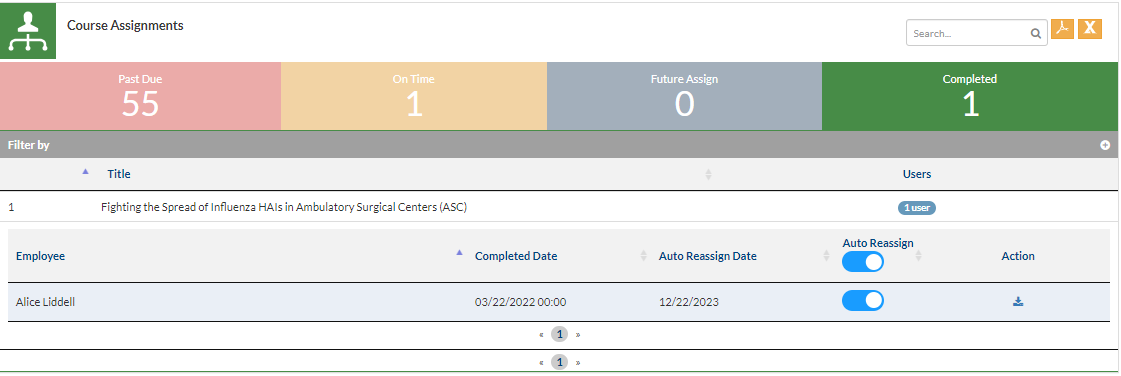
CL_assignsingle.mp4All courses that have been set up with Custom Auto-Reassignment will reflect in the Admin Dashboard once they are completed:
Make sure to mention that it is the same process to assign courses outside of bundles, or single courses. Single assignments look like this:
All courses that have been set up with Custom Auto-Reassignment will reflect in the Admin Dashboard once they are completed:
For CPR courses: All CPR courses are available in the Course Library and can be assigned there, admin can track them on the Admin Dashboard, and students can complete them in their Student Dashboard or My Course Assignments facility. These courses can be found by typing “CPR” in the search bar. The menu options will remain visible if the user has already been logged in before we applied the change. Accessing the facilities will give them a 404 error if someone reports it. After they log out and log in again, the facilities will no longer be visible. Remember that 1 credit will be deducted per person. 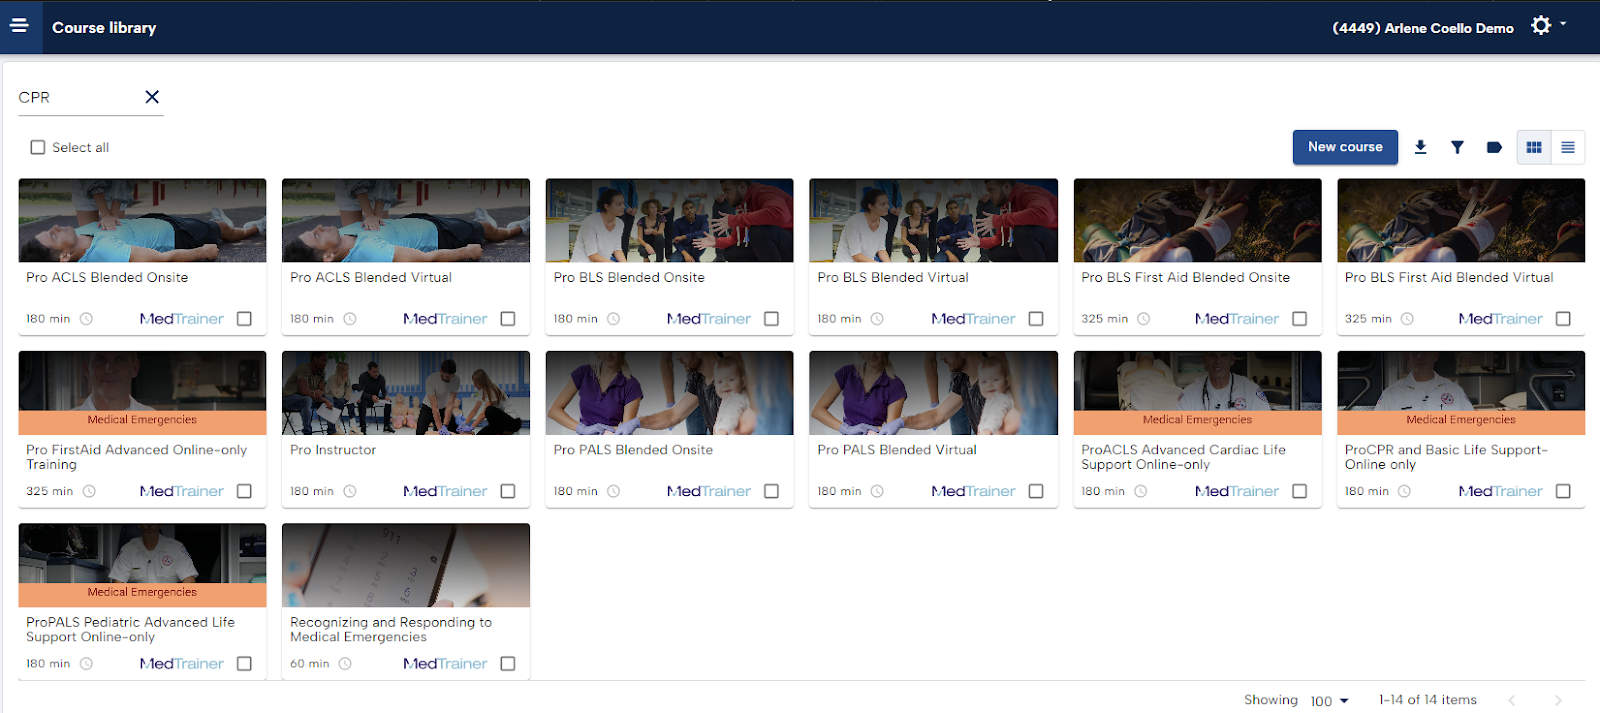 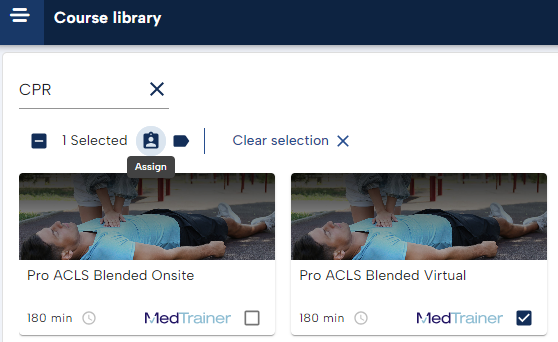 |
Admins can upload their own SCORM file courses without additional cost.
20240704-1749-02.2227047.mp4The admin will need to have the content zip files ready. The formats we support are the |
For more information about file compatibility and size limits, please visit the https://support.medtrainer.com/home/general/file-compatibility-size-limits page. |
General information section is also divided into sections, not all of them are mandatory
|
“Course Upload Failed” in the course library |
“A Continuing Education Unit (CEU), also known as Continuing Education Credit (CEC), is a vital measure in ongoing education programs, helping professionals maintain their licenses. Staying ahead of cybercriminals requires continuous learning in this ever-evolving industry. CEUs are mandatory to keep certifications current and maintain professional status.“
“Continuing medical education consists of educational activities which serve to maintain, develop, or increase the knowledge, skills, and professional performance and relationships that a physician uses to provide services for patients, the public, or the profession. The content of CME is that body of knowledge and skills generally recognized and accepted by the profession as within the basic medical sciences, the discipline of clinical medicine, and the provision of health care to the public.“
To learn more about CMEs and CEUs, visit https://intellectualpoint.com/what-are-continuing-education-units/and https://www.accme.org/accreditation-rules/policies/cme-content-definition-and-examples
This library lets admins search for courses by state and license type. This makes assigning courses with available CEUs more efficient and targeted.
20240704-1910-03.8949087.mp4Available courses won’t appear until both filters are used. Also, the assignment process in this library is the same as in the default Course Library. Please enable the CE Course Library in the account Company Settings, selecting both Yes-Yes, to ensure that Students can view and self-assign courses.
Note that the same reassignment options shown in the Course Library will also be applicable here.
Available courses won’t appear until both filters are used. Also, the assignment process in this library is the same as in the default Course Library. Please enable the CE Course Library in the account Company Settings, selecting both Yes-Yes, to ensure that Students can view and self-assign courses.
Note that the same reassignment options shown in the Course Library will also be applicable here.
After selecting which location and/or department, the admin can select one employee to manage the course, even if that person has a Student account level. That person will be able to start, pause and complete the course, and also take roll call.
After selecting which location and/or department, the admin can select one employee to manage the course, even if that person has a Student account level. That person will be able to start, pause and complete the course, and also take roll call.
The new ‘Learning dashboards’ module, provides admins and super admins, a comprehensive overview of the assignation statuses for a specific course, through a preconfigured pie chart. By having access to this dashboard, admins can:
Make informed decisions based on the easy to read key metrics
Save time that otherwise would be spent collecting data
Monitor the assignation statuses for a course in a quicker and simpler way.
Keep track of the completion of the courses.
Only admins and super admins will have access to this feature.
Only admins and super admins will have access to this feature.
Make sure to guide your admin through these steps:
Accessing this feature
A dashboard walkthrough
The dashboard catalog (dropdown menu on the top-right side)
The widget selector
Filter usage and more action
For a more comprehensive breakdown on this feature, please read the https://drive.google.com/file/d/1FRZWbUQM5-6hr5lEhDL9ExozAvYh19qh/view |
In this module, make sure to cover the following with the admin:
Let the admin know that the (?) button (on the top right corner) leads them directly to the Support Center section called “Curate Your Reports”. Let the admin know that the (?) button (on the top right corner) leads them directly to the Support Center section called “Curate Your Reports”.
Type or paste something here to turn it into an excerpt. |
In this module, admins will be able to:
Monitor course status
Monitor the number of users assigned per course
Send reminders, unassign or change due dates for Past Dues and On Times, both massively and individually.
Download completion reports on the Completed tab.
This module will let the admin see how the students will see their own dashboards. Please cover the following:
Courses
External Transcripts
User Messages
Though this is covered during the Organization Management Training (during the OB Call), it is suggested to review in case the admin has any questions, or if you are training an already onboarded account.
20240704-2247-39.3530767.mp4Make sure to let the admin know that they can also set up the following as “welcome kits/packets” for either new employees or any other specific matter:
Courses
Course bundles
You can share this video with your admins in case they have any more questions:
https://vimeo.com/881349649/056c413d0f?share=copyYou can share this video with your admins in case they have any more questions:
https://vimeo.com/881349649/056c413d0f?share=copyA couple of these reports are still active in several accounts, but remember that the main goal is to get our admins to migrate into the In-App reports fully.
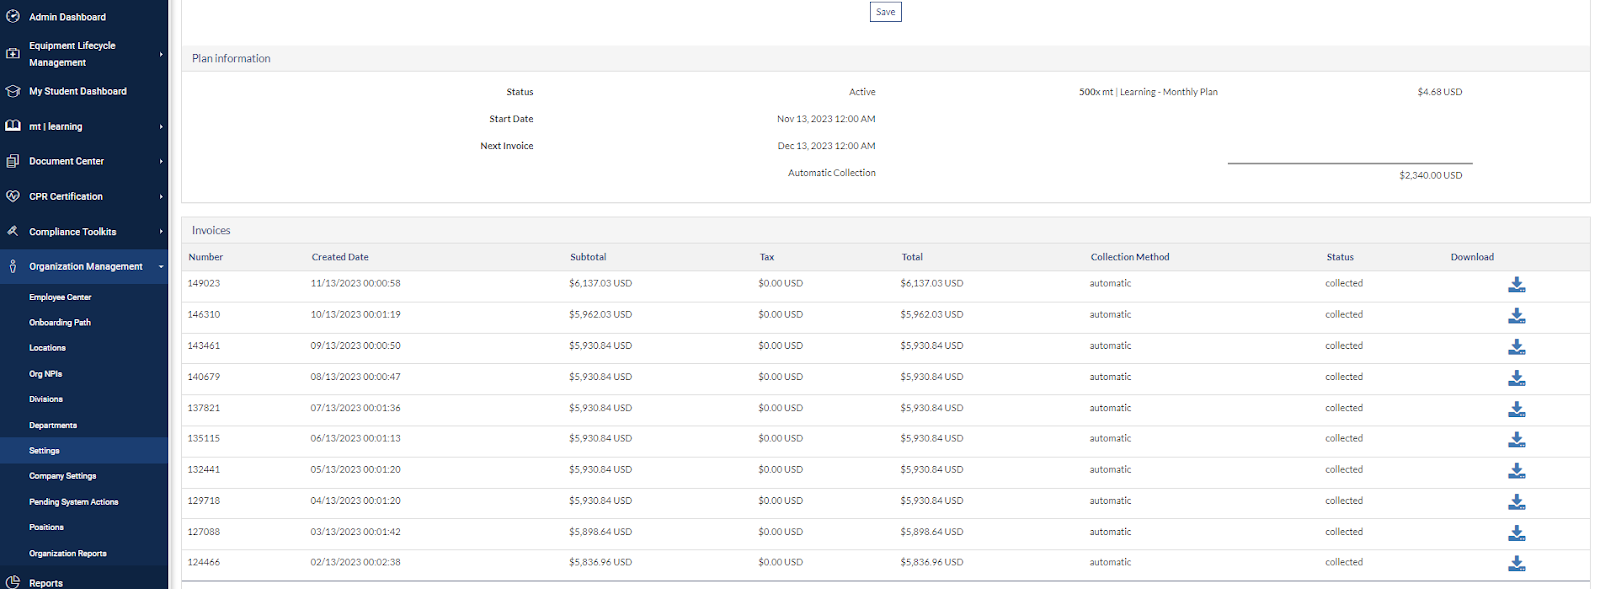
20240814-1951-43.9477101.mp4Simple changes like enabling email notifications, changing the company name and address, and updating the super admin’s password.
20240814-1953-47.0414072.mp4Only super admins will be able to see billing information at the bottom of the screen. |
If a course is not fully assigned to all staff members, the first place to check will be this page. If anything appears as a pending action, it may be due to one of these two reasons:
The assignee already has had that course assigned to them in the past.
The assignee already has that course in progress.
These help our admins tailor out how they want their LMS accounts to work. Remember to go into module-specific settings here:
Under General Settings:
Auto Accept Group Learning - Enabling this feature allows learners that are assigned with a group course to automatically receive a certificate of completion after the training is complete without the need of accepting and validating their participation.
Under Modules:
Course Library
CE Course Library
Massive Assign
Onboarding Path
Under Reminders:
External Transcripts Email Notifications
Courses Notification
Auto Re-assign Courses
A custom course refers to a unique and tailored e-learning course that is designed and developed to meet an admin’s specific learning objectives and requirements. It involves the development of course content, multimedia elements, assessments, and interactive components that align with the organization's specific goals, industry standards, and learning outcomes. They also offer flexibility and allow organizations to deliver targeted and personalized training experiences to their learners.
Our admins may request said courses directly to their assigned CSMs or to the Customer Support department. When they do, please provide them with the https://drive.google.com/file/d/1WrY9DlyGDl7xrdmNKRWMYph9dwxbCDMG/view?usp=drive_link so they can fill out the specifics of their request. As a suggestion, and for more efficiency, fill this with the customer during a call or meeting if the opportunity presents itself.
Once the Conversion Course Request Form is filled, and you have all specifics, please follow the instructions below:
20240708-1435-41.0553153.mp4Please make sure to be as clear and detailed as possible with the information you fill in.
On the “Will the request finalize the sale” field, please select “Not Applicable”
Even though the “Internal Department Information (DO NOT FILL)“ section at the bottom is an Internal Courses Department section, SF will not let you create the case until you select a Status. It is important to mark it as “New”.
Please make sure to be as clear and detailed as possible with the information you fill in.
On the “Will the request finalize the sale” field, please select “Not Applicable”
Even though the “Internal Department Information (DO NOT FILL)“ section at the bottom is an Internal Courses Department section, SF will not let you create the case until you select a Status. It is important to mark it as “New”.
Please remember to keep these questions in mind when creating your cases:  |
These are the courses we currently offer:
BLS - Basic Life Support
Basic (180 minutes, 6 CE Credits)
BLS/First Aid - Basic Life Support and First Aid
Basic + (325 minutes, 8 CE Credits)
ACLS - Advanced Cardiac Life Support Clinicians and First Responders
(180 minutes, 6 CE Credits)
PALS - Pediatric Advanced Life Support Clinicians and First Responders
(180 minutes, 6 CE Credits)
Online Only
Blended:
Blended-Onsite Testing
Blended-Virtual Testing
For details on the Skills Exam and what our admins need to become a CPR Instructor, please review them in the https://docs.google.com/presentation/d/1p1xuokZVh7uIRC_ezefPgD4w9mrxhaRf1N2ZlIU1afQ/edit?usp=drive_link presentation.
Here are some notes about pricing:
Prices above apply to initial and recertification training
Tiered pricing based on number of users is being phased out
10% discount for bulk purchases and to encourage sales can be applied by CSM at point of sale
Discounts 10% must be approved by Dave.
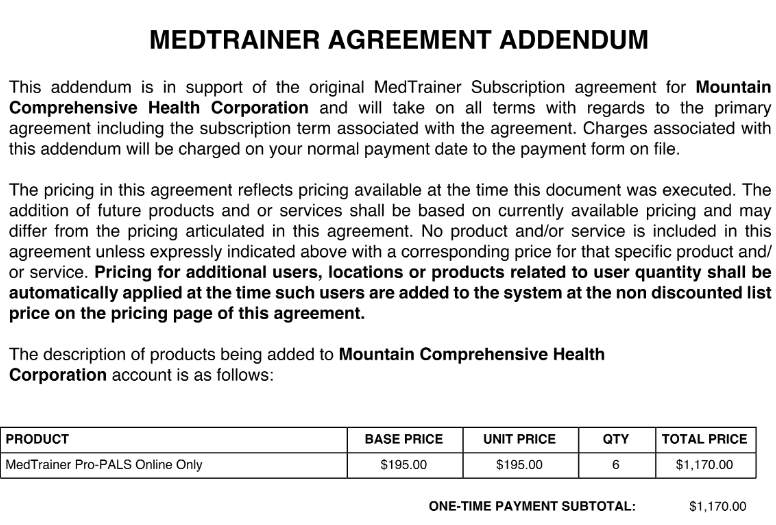
There is a strategy called “Take the REINS”. For further detail on it, so you can follow it and achieve this goal more easily, please feel free to review the Take the REINS presentation. Regarding sales, CPR is considered OTR (One-Time Revenue). You can set up a sales opportunity as you normally would, but the document you would need to generate is an addendum that looks like the one below:
Since it is OTR, there is no strict need for following the sales demo process to a letter. A demo can occur only if you find it necessary, but there is normally not the need to. Just make sure to:
Name your opportunity correctly
Fill in the correct data,
Leave “Expansion Revenue” as Revenue Classification.
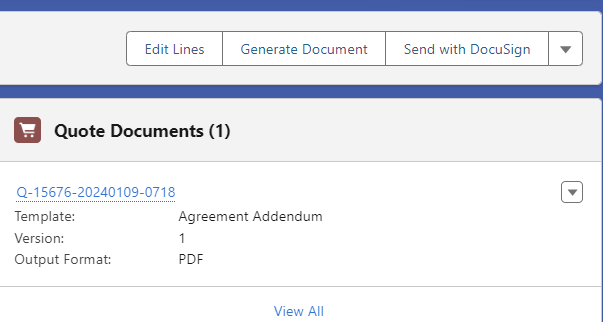
Once you have the opportunity information complete and the addendum generated, go into the Quote and click on “Send with DocuSign”:
To enable credits, you will need to have the following in mind:
Account’s LMS ID
Type of course purchased (please refer back to the addendum or the Course Versions section).
Amount of credits (remember: 1 credit = 1 course for 1 user).
CEUs can be obtained after taking CPR courses, by following the instructions in this video. https://drive.google.com/file/d/1ockowO01Pj3PooXHKgiF2HPFmgdU4mXM/view?usp=sharing. Please feel free to share the video link with your admins.
Getting your CEUs from CPR Training..mp4Once the training session has been completed, send a email using the Outreach Training Recap Outreach Email Template immediately after the training session recording has been processed (or at least before the end of day), and fill in necessary information such as:
Participants
Modules
Pending Subjects
Relevant Links
It is paramount to not only encourage, but reinforce the admin on the use of our Customer Support Department. Provide the contact information below:
Email: support@medtrainer.com
Phone number: 844.596.6553
The Support Module in the MedTrainer platform.
If the account acquired the Learning and/or the Credentialing Software Modules, please refer to any of the following SOPs:
Lastly, please refer to the https://medtrainer.atlassian.net/wiki/pages/resumedraft.action?draftId=4135616513&draftShareId=a3711c8d-3de8-4bf5-95fb-6db42e50e83c, in order to continue with the account adoption following the instructed guidelines.